

I ACKNOWLEDGE THAT the purpose of public betas is to test future official FL Studio release versions.PUBLIC BETAS EXPIRE in order to encourage users to download the next beta (if available) and continue testing. I have noted the expiry date and put it on my calendar/electronic reminder system. I WILL NOT rely on Public Betas for any time or project critical work. I realize a new beta may not be immediately available when this one expires. If I complain when a public beta expires, stops working or crashes I can expect to be taunted by Image-Line staff and fellow users for ignoring every attempt to educate me as to the potential issues when using an FL Studio beta.
Debug code - FL Studio 10.6 Beta includes debugging code that may report things such as memory leaks, 'debug' text being displayed in various plugins and hint text fields and occasionally slower loading of patches/components. In return for this we expect to deliver a much more stable & efficient release version of FL Studio 11 when it's time.
Installation
You download the FL Studio 10.6 Public Beta HERE (248MB). Expires on 1 October, 2012. Put this in your calendar.
You can download a new regcode (either from your user account or from FL's own about box) to register BassDrum and GMS.
Bug reports - Discuss 10.6 bugs and issues here.
Known issues
- memory leak on import of MIDI file
What's New?
Multi-touch support - FL Studio (and some plugins) now respond to Multitouch. If you want to get involved in multi-touch testing and development click here.
Debugging code - This version contains code to help us track any bugs deep in the code. When you close FL Studio you may see a pop-up window reporting things such as 'memory leaks'. If you see this please report here.
BassDrum - BassDrum is (not surprisingly) a Kick/Bass percussion synthesizer with sample layering.
GrooveMachine Synth - 1 x Synth & FX unit from Groove Machine.
Plugin picker - Right-click to open a plugin and its presets in the Browser.
Harmor - Now supports Komplexer WT wavetables & 'Map audio regions to keys' with auto-dump to score for Slicex like drum handling
위가 배포 내용입니다.
기대가 되는건 새로 배포하는 두개의 플러그인 인데,,,,
하나는 Bass Drum이라는 킥과 베이스 포커션 신디사이저를
또 하나는 그루브 머신의 채널 하나를 뽑아낸듯한 미니 신디사이저 라고 보시면 될것 같습니다.
그루브 머신도 개인적으로 꽤 좋아하고
재가 좋아하는 뮤지션들이 만든 프리셋도 있어서 쓸만한 툴이라고 생각하는데
여러분들은 어떠신지 모르겠습니다..
아래는 베이스 드럼
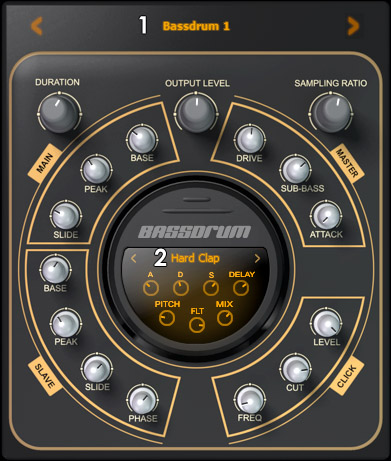
BassDrum
BassDrum is a flexible Bass/Kick drum synthesizer with sample-layer support. Get ready to rumble...your neighbors!
 |
- Open preset manager - Click here to open the manager. The arrows, at either end, can be used to change presets.
- Open sample layer manager - Click here to select a sample layer OR load samples from the OS browser. Alteratively you can drop .wav or .aif samples on the UI to load a sample. Use the arrows, at either end, to cycle through the currently selected library.
Parameters
The main BassDrum synthesis consists of two Oscillators (Main & Slave) and a sample layer (usually to add noise or texture). Following that there are sub-bass, distortion and pitch controls.
Overall controls
- DURATION - This is a master envelope that controls the duration of all generators. There is no release time so BassDrum will sound until the duration is reached, even if the note is released before the duration time is reached.
- OUTPUT LEVEL - +/- 20 dB final output level trim.
- SAMPLING RATIO - Acts similar to a pitch control with a little difference: This changes the internal sampling rate (not base/peak frequencies) to resample the entire plugin output. Low settings result in a gritty 'aliased' sound.
MAIN Oscillator
The Main Oscillator controls set the start, end and glide-time of the oscillator. Kick sounds are typically synthesized by a very fast slide from a high to low frequency.
- BASE - End frequency.
- PEAK - Starting frequency.
- SLIDE - Frequency slide time.
SLAVE Oscillator
The Slave Oscillator mirrors the Main Oscillator, but here controls are relative to the Main Oscillator settings. Set in the minus range to be below or positive to be above the Master Oscillator's settings.
- BASE - End frequency offset (+/- 100%).
- PEAK - Start frequency offset (+/- 100%).
- SLIDE - Frequency slide time offset(+/- 100%).
- PHASE - Slave Oscillator's phase offset relative to the Master. Phase is achieved through a delay relative to Main. The Slave Oscillator will sound after Main Oscillator with positive settings and will lead to phase cancellations of frequencies from the Main Oscillator.
CLICK
Specialized click generator
- LEVEL - Click loudness.
- CUT - Larger values selectively filter low-frequencies from the click sound.
- FREQ - Frequency of click Oscillator.
MASTER
- DRIVE - Saturation-like distortion.
- SUB-BASS - Sub-bass gain. Sub-bass frequency is relative to the Main & Slave Oscillators.
- ATTACK - Quick level fade-in. Useful to soften the initial click and/or to find better balance between the BassDrum and other sounds such as a Hi-Hat in the mix.
SAMPLE LAYER
You can drag and drop samples directly on BassDrum to load them.
- < Selector > - Choose a sample by clicking on the arrows OR in the center to open the sample menu. Use Load to select samples from your browser.
- A, D, S - Volume envelope, Attack, Decay and Sustain levels.
- Delay - Timing of the sample layer relative to the oscillators. -100% the sample leads the oscillators. 0% the sample and oscillators sound simultaneously. +100% the sample follows the oscillators.
- PITCH - Sample pitch.
- FLT - Left = Low Pass filter (removes high frequencies). The knob changes the cutoff frequency.
- MIX - Relative level of the sample layer (0 to 100%).
Plugin Credits: Maxx Claster
아래는 그루브머신신스
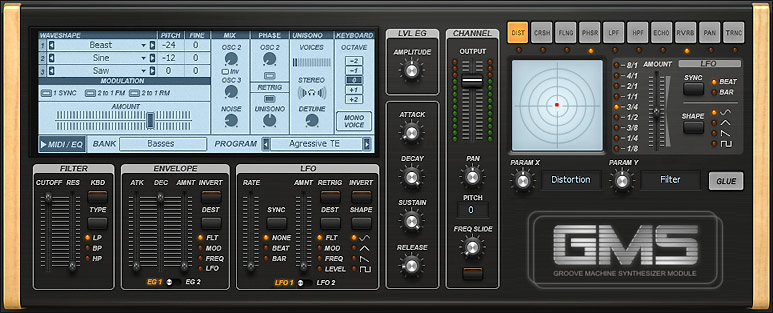
Groove Machine Synth 
Groove Machine Synth is multitimbral hybrid synthesizer & FX channel from Groove Machine.
 |
Options & Controls
Click the MIDI/EQ button (showing SYNTH below) in the lower left of the screen to toggle between SYNTH and MIDI/EQ panels.
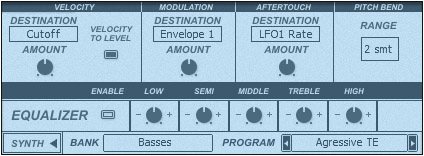 |
- MIDI - From the top section you can set various MIDI controller input to a selected range of Groove Machine targets. Select the target using the DESTINATION drop-down menu box.
- VELOCITY - Assign keyboard velocity to control a range of targets in Groove Machine. The VELOCITY TO LEVEL switch enables the basic velocity to volume relationship.
- MODULATION - Assign the mod wheel to a range of targets in Groove Machine.
- AFTERTOUCH - Assign aftertouch to a range of targets in Groove Machine. Aftertouch is pressure applied to keys/pads after being played, this feature may not be supported on your MIDI controller.
- PITCH BEND - Set the Pitch Bend wheel to bend-range relationship.
- EQUALIZER - The 5 band equalizer is post-FX and covers the range of center frequencies of 60 Hz, 220 Hz, 1500 Hz, 8000 Hz and 12000 Hz respectively. ENABLE - Activates the EQ.
Synth Panel
The synthesizer is a hybrid additive, FM (Frequency Modulation) & RM (Ring Modulation) design.
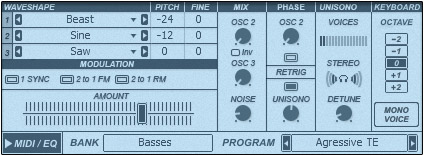 |
- Oscillator section - There are 3 independent oscillators.
- WAVESHAPE - Click to select from predefined shapes or load waveforms from .wav files or the library. You can also drop waveforms on each of the 3 oscillators.
- PITCH - Pitch change in semitones.
- FINE - Pitch change in cents.
- MODULATION - Select from one of:
- 1 SYNC - OSC1 will be synced by the frequency defined by AMOUNT fader.
- 2 to 1 FM - Oscillator 2 is linked to Oscillator 1 in a Frequency Modulation relationship.
- 2 to 1 RM - Oscillator 2 is linked to Oscillator 1 in a Ring Modulation relationship.
- AMOUNT - Sync, FM or RM amount.
- MIX
- OSC 2 - Mix for Oscillator 1 & 2.
- INV - Invert the phase of Oscillator 2.
- OSC 3 - Mix for Oscillator (1+2) & 3.
- NOISE - Mix between all oscillators and white noise source.
- PHASE
- OSC 2 - Oscillator 2 phase.
- RETRIG - Oscillator 2 phase retriggering.
- UNISONO - Unison phase.
- UNISONO - Multiple detuned voices are generated per note for a chorus-like effect.
- VOICES - Choose between 1 and 16.
- STEREO - Stereo spread of voices.
- DETUNE - Detuning of voices.
- KEYBOARD
- OCTAVE - Octave for all Oscillators.
- MONO VOICE - Monophonic mode with portamento.
Articulation
 |
- FILTER
- CUTOFF - Channel global filter cutoff frequency.
- RES - Resonance.
- KBD - Keyboard scaling. The filter cutoff will track up and down with the note played. Higher notes having a higher cutoff frequency e.t.c.
- TYPE - Switch between LP (Low Pass), BP (Band Pass) & HP (HighPass).
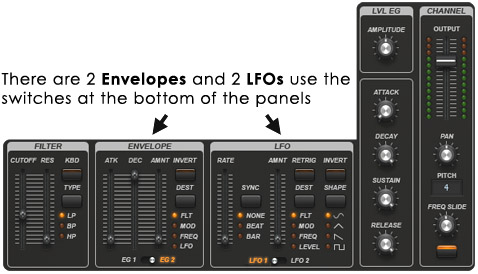
- ENVELOPE
- ATK - Attack time.
- DEC - Decay time.
- AMNT - Amount of envelope applied. Envelope scaling.
- INVERT - Invert the phase of the envelope.
- DEST - Target parameter for envelope modulation.
- EG1 / EG2 - There are two envelopes available, switch between them here.
- LFO - Low Frequency Modulation is used as a source to rhythmically or otherwise vary synthesis parameters.
- RATE - LFO Speed.
- SYNC - Synchronize the LFO period to NONE (free running), BEATs or BARs.
- AMNT - LFO modulation amount.
- RETRIG - Retriggering restarts the LFO phase on each note. Leave off for a free-running LFO effect.
- DEST - LFO destination. Select the target to be modulated by the LFO.
- INVERT - Inverts the LFO waveform.
- SHAPE - LFO waveform shape. NOTE: The Sine (top shape) is bipolar, generating both +1 and -1 values at opposing peaks. The remainder of the shapes (Triangle, Saw & Square) are uni-polar producing values between 0 and 1.
- LFO 1 / LFO 2 - There are two LFO sources available, choose the LFO to be edited here.
- LVL EG - Envelope Generator Level. The envelope is used to shape the volume contour of the sound of each note played.
- Amplitude - Overall gain.
- ATTACK - Attack time, low if faster.
- DECAY - Decay time, low is faster.
- SUSTAIN - Sustain level. Volume for the duration of the held note.
- RELEASE - Release time, low is faster. Try increasing this a little if notes 'click' when released.
- CHANNEL
- OUTPUT - Global Channel volume.
- PAN - Global Channel panning (position in the Left to Right stereo field).
- PITCH - Global Channel pitch (semitones).
- FREQ SLIDE - Slide time for portamento style effects. Activate with the switch below the knob.
Effects
There are 10 performance oriented effects:
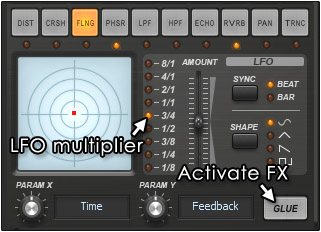 |
- GLUE - Click this switch to permanently enable the selected effect. Momentary activation can be gained by clicking in the X/Y panel.
- Effects - There are 10 effects these include:
- DIST - Distortion. X - Distortion amount. Y - Low pass filter cutoff frequency.
- CRSH - Bit crusher. X - Sample-rate reduction amount. Y - Low pass filter cutoff frequency.
- FLNG - Flanging. X - Depth. Y - Feedback.
- PHSR - Phasing. X - Depth. Y - Feedback.
- LPF - Low pass filtering. X - Low pass filter cutoff frequency. Y - Resonance amount.
- HPF - High pass filtering. X - High pass filter cutoff frequency. Y - Resonance amount
- ECHO - Delay/Echo. X - Feedback amount (echo strength) Y - Echo filtering.
- RVRB - Reverberation. X - Feedback. Y - Wet level (reverb amount).
- PAN - Panning. X - Left/Right pan position. Y - Binaural effect level. Up/Down.
- TRNC - Trance effect. X - Release time. Y - Drop level. Use this effect to induce side-chain style pumping.
- LFO
- LFO Multiplier - Select a multiplication factor for the LFO.
- AMOUNT - LFO multiplier, from 0 to 100% (top).
- SYNC - LFO can be synced to the Bar or Beat.
- SHAPE - LFO waveform shape.
- Arm X / Y - Each effect has a pair of unique performance parameters.
Plugin Credits:
Code: Maxx Claster
Presets: Toby Emerson, Arlo G (nucleon).


좋다기보다는 뭔가 자꾸 숙제가 생기는 기분입니다. 아하하...